Funny….

A complete departure for me, esthetically and technically. I wanted to try my hand at some fold forming, so I came up with this morning-glory. Made with 26 gauge fine silver, the flower itself was surprisingly easy to make, I just had to keep annealing and hammering until I got the right shape.
")
The ring shank is forged sterling silver, made to resemble a stem. I set a 6mm London blue Topaz in the flower. I wanted the blue of the topaz to reflect inside the flower, so I set the stone upside down. That was about the hardest part of this ring, but all in all not that hard. I kind of made it up, a cross between a tube and bezel setting.
") By the way, this ring is completely UNWEARABLE! The petals are so thin, that I’m sure it will completely disintegrate with the slightest ding. But hey, it was fun to make.
By the way, this ring is completely UNWEARABLE! The petals are so thin, that I’m sure it will completely disintegrate with the slightest ding. But hey, it was fun to make.
Here is Selma modeling again. It looks lovely on the hand. I could try making it with much thicker silver, but it might be a lot harder. So I’m just leaving it be.
")
This week, I decided to make another stacked ring. I’m exploring simple hollow forms and I learned that bubbles (or spheres) are not as easy to make as they look. But I love the process of starting out with a flat disc of metal, then slowly seeing it take shape. I also wanted the ring to look funny.

I decided to texture the metal with a planishing hammer to give it more of a bubble look.
As far as fabrication, the hardest to make was the base bubble (22mm), then they got easier as they got smaller. The smallest (6mm) was also hard to make because it kept slipping out of my fingers. Soldering was definitely a challenge (and I think I’m pretty good at it) – I used a lot of “white-out” to prevent the solder from running after each consecutive step.

It took a lot longer than expected (doesn’t everything!), and to prevent myself from going crazy, I made the ring over several days.
By far the hardest step was soldering the ring shank after all the bubbles, and this is where I think I made a mistake. I should have soldered it on to the base bubble as a first step. Instead, by the time I had all the bubbles on, I had a hard time getting the “clump” to the right temperature, for even the easy solder to flow. But it finally did!

I’m also wondering, design wise, whether I should have had a half bubble on the base. I’m undecided. Maybe I’ll just cut it and see how it looks. Right now, the ring is sitting in an airtight container with a bunch of tobacco, vinegar and ammonia to see if I can get the copper to patina to a blue-green. I’ll find out in a couple of days.
What I learned this week:
I think I will be laying off the stacked rings for a little while, but I’ll keep playing with the hollow forms.
Last week’s ring was very hard for me, and, re-reading my post, I realized that it didn’t seem as much fun as it was or should have been. My post was full of ‘I had to’, and it isn’t really in the spirit of the challenge.
Well this week, it was pure fun. This ring just flowed!

Made entirely of 16 gauge bronze wire, it is simple, elegant, and weighs next to nothing!

I really like how it turned out. The bronze color is stunning, and I gave it a super matte finish with a coarse fiber wheel. Selma loves it. Again, here she is modeling HER ring.

The ring measures 40mm at its widest, but doesn’t look or feel chunky at all. Love. Love. Love!

Happy Valentine’s Day!
One of the reason I joined the Ring a Week challenge was to try to improve my precision. I knew going into it this week that it would not be easy. Three stacked “pillows” made from metal tubing cut at 45° angle. What I didn’t realize was just how difficult it turned out to be. First, I had to make the copper tubing since I didn’t have any on hand. Not a good idea! I don’t have a draw plate or a rolling mill, and the thinnest copper sheet I had on hand was 22 gauge. After what seemed like hours of pounding and bending and huffing and puffing and cursing, I managed to get a “roundish” tube with an open seam.

Next came cutting at 45°. Even though I have a jig to cut the tubing at an angle, I don’t think I’ve ever spent as much time on any step before. I would file down the edges to what looked liked a perfect 45°, try to match it to the next piece of tubing and the next, but somehow I always ended up with a little gap somewhere. Every copper piece had to measure exactly 15 mm long. After more hours of this exercise, I decided whatever I had was good enough. Next I had to repeat the cutting step for the 2 silver elements on top, the middle 10 x 10 mm, and the very top, a whopping 5 x 5 mm. At least this time, I didn’t have to make the tubes. Surprisingly, the smaller the pieces, the easier it was to get a good angle (either that, or I got better at it!) Now I have little cuts all over my fingers from handling all the sharp edges.

Next, I had to solder the individual pillows. Oh my! more hours of futzing and cursing and melting pieces (so I had to go back and cut some more.) I finally got the pillows and ring shank done, and the last step of soldering the stack went without a hitch. I polished the ring with 220 3M bristle discs and spent another couple of hours oxidizing the middle pillow, trying not to smudge the other two (I ended up having to do it with a toothpick.)

The whole process took about a day and a half. I wanted to give up so many times, scrap it and start a new ring. I’m glad I stuck with it – I learned a lot.
I’m pretty sure next week’s ring will be something very simple…
This week I had to make quite a few Pebble pendants and decided the RAW will be a pebble ring as well. I was using Venice beach pebbles which are dark charcoal in color, almost black, and are very easy to drill. They are also the flattest I can find on any beach. I don’t know what the actual rock is and I suppose I should try to find out. I was very excited about the design, so excited that I didn’t sketch or even think about it. I was going to just wing it…

Normally, my pebble pendants are just riveted in the back. For this ring, I decided to make a traditional bezel construction with the rivets on the back of the bezel plate. Since I didn’t really think about how to make the ring, I mis-placed the rivet holes. They ended up being too close to the ring shank, and it took me hours to properly rivet them.
 In the end though, I think it’s a very successful ring. It feels great and looks very cool. I love the shiny smooth silver against the dark matte of the stone. As usual, Selma is modeling the ring.
 She is starting to complain about how I have her sit there and do it. Maybe next time I’ll make a ring for her…
 Later this week, I’ll try to post pictures of the pendants I made. They look AWESOME!
Here is my new entry for the Ring a Week challenge. (Click images for larger view)

I wanted to make something over the top, a bit un-wearable, like those cakes you see on Ace of Cakes. I’ve been thinking about this ring for a while, but when I finally decided to make it, I knew it would turn out well. I also had so much fun making it. It was a bit of a challenge to try to figure out how to solder all the saucers on top of each other, without having it fall apart. Originally, I wanted to add more tiers to it, but thought that it might be overkill.

I used sterling silver and copper, and gave it a nice scratched finish with 220-grit paper. It is 47mm tall and 30mm at its widest and is a bit on the heavy side.

I can’t wait to see what I’ll make for next week!
As if I don’t already have a ton of things to do, and because of all my free time (NOT), I’ve decided to join the “Ring a Week” Challenge (aka RAW.)
The idea is that it will be a personal challenge to make one ring every week of the year, then post the pictures on the flickr group page. There are no rules (my favorite kind of challenge) and the rings can be made using any material, and don’t have to be tangible items either. I decided to join the group to try to learn more techniques and experiment with ideas and designs. Why not.
So, here are my entries so far:


RAW52.2 – I wanted the ring to look like it had some nails on top. I oxidized the ring to a dark black (to look like iron) then polished the tops with steel wool.


So far so good. I’m really enjoying this, and already dreaming up designs to make….
Here are a few of my pebble pendants. I’ve collected pebbles for years, from every beach I’ve visited, all over the world. I mostly look for the flattest ones I can find.

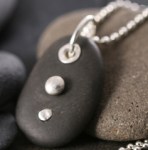


Photo by Carole Zakkour
