Ten Women Gallery
I recently joined Ten Women Gallery on Main Street and Montana Avenue in Santa Monica. They are 2 separate collectives of local women artists.
You can visit my shop here and here.


I recently joined Ten Women Gallery on Main Street and Montana Avenue in Santa Monica. They are 2 separate collectives of local women artists.
You can visit my shop here and here.
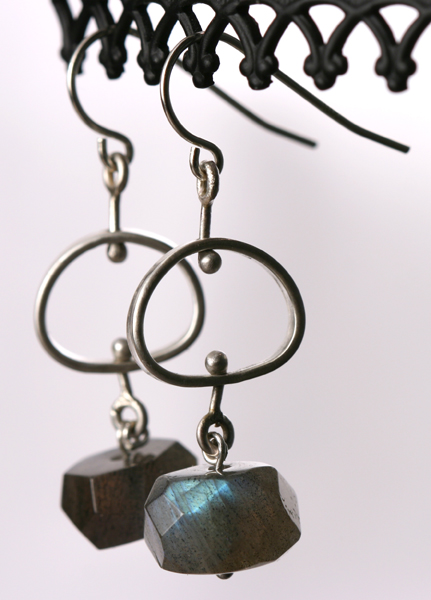
Labradorite Pebble Earrings
I don’t know why I never used to enjoy making earrings. I always thought it was double the work and half the fun. For some reason, that’s all I’ve wanted to make lately.

Pebble Earrings
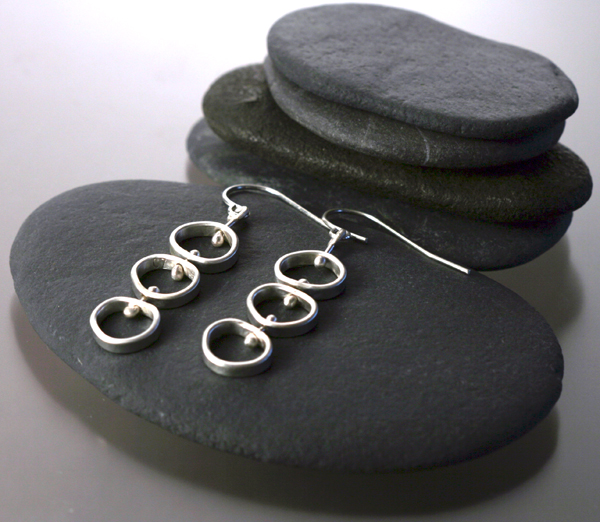
Pebble Earrings
Simply stunning….
It’s been such a long time since I posted, I almost forgot how to do it, and I am so late with my Ring a Week submissions.
I made these rings a while back in May, when I was thinking about summer and getting away, and all the beautiful beaches where I’ve collected pebbles.
Pupnatska Luka beach is on the island of Korcula in Croatia. It’s in the middle of nowhere really, with beautiful hills all around it.
 I collected a bunch of pebbles there, quite different from the flat ones that I usually go for (there weren’t any flat ones either!)
Since I was so behind with my rings, I had to devise a little plan…
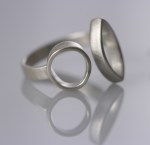
RAW52.17: I wanted the ring to look like you just put your hand in the water and some pebbles got stuck on it.


I just love the simplicity. So I decided to make more.
RAW52.18: Here’s a slightly different shape. Still works for me.
 And here is a back view where you can see how they are made. I drill a hole in each pebble, then make a “seat” for each one and solder a post in the middle of it. The shank is 1.6mm round Sterling silver. After polishing, I secure the pebbles with epoxy. That’s it.
 RAW52.19: Here is another version. I really like the contrast between the light and dark pebbles.
 It’s quite lovely when on the hand…
 RAW52.20: I also wanted to somehow convey the water, so naturally I went with Turquoise.
 I used a bead instead of a cabochon – I didn’t want it to look perfect. Still the same construction, but this time I riveted the stone.
 I can keep going on forever! I love making these rings, easy, and each one is different. Plus we have the added bonus of combining them.
RAW52.21: Voilà, instant ring!
 All you have to do is wear them together.
 and…
and…
RAW52.22: Yes, I’m going there!
 I really like this one!
Of course, none of these rings would have happened if it weren’t for Ivana and Erika. Hvala my friends!
I can’t believe it’s been so long since my last post, but we had spring break and taxes and a social life, so things get put on the back burner for a little while. I worked on my rings during this time, but I didn’t get a chance to photograph or finish them. I started the first one by making a box. I’ve always wanted to make one out of metal, and I was always scared to try it: maybe it would be too hard, maybe I don’t have the precision skills to do it, or maybe it just won’t look good. Well I was wrong!


I wore the ring without jewels for some time, until I finally decided what to do with it.
I crushed up some bad peridot beads, got some cubic zirconia in different colors and epoxyed the whole lot to the ring. That came out really good! Nice box!


I rubbed the box with 320 sandpaper, oxidized it with liver of sulfur, then brushed it again with the sandpaper, but only loosely in vertical and horizontal directions. Selma squealed when she saw the ring, so of course it is now hers!


So now I’m all caught up on Ring a Week. I learned a lot and I enjoyed the break. It actually allowed me to develop this box theme and push myself a little bit.
I’m late with last week’s ring because it turned out to be a lot more involved than I thought it would be.
The “Ring a Week” group moderator put out a challenge a few weeks ago to do a kinetic ring. WOW! I figured it had something to do with movement. I had many ideas, but my first was to do a zoetrope, and I kept going back to it. Initially, I wanted to make one of the traditional ones, like this:
 Except that I would scale it down for the ring of course. But while I was doing some research to try to figure out how to build the ring, I came across a few videos that completely changed my direction. Here they are:
This is by Jim le Fevre. I think he was the first to come up with the idea of this 3D zoetrope on a turntable running at 45rpm.
The other video was from Tim Wheatley, using a bicycle wheel:
This one nailed it for me. I was hooked, and I really wanted to do a 3D zoetrope ring! Pretty soon you know, it was no longer about the ring, but about the process and trying to figure out how to make it, and how to adapt it to a ring.
I made a test model with a copper disc that could freely spin, but I couldn’t figure out how to make it spin at a constant speed. The whole idea is actually a visual trick that you cannot see with the naked eye. It has to be on a video with a high shutter speed (otherwise you’ll get mostly a blurred effect.) This is when I decided the whole ring had to spin, perhaps on my flex shaft. After a bit of old fashioned trial and error (no fancy math here), it all came together pretty quickly. Here is the ring, stationary:


Mark helped a lot with filming it. We borrowed a friend’s fancy digital video camera and played around with the settings until we got it right. Then I had to get a crash course in iMovie to edit the darn thing (that’s why I was late…) And here is the result, spinning!
This project was so much fun, I can’t wait to try another ring like this, maybe a little fancier. I also learned a million things, here are a few:
This is a first for me, so I’m really excited. One of my rings was published in a how-to book for jewelers called 30-minute rings. Yay!

This week, I decided to stay with the hollow forms, although I’m starting to think I should work a bit with gemstones or at least more complex hollow forms. I’ve made versions of this ring in the past, and I quite like the in-between-fingers rings. The ring represents simplified lotus seed pods, and presents another chance to incorporate bronze.
 The construction is quite simple: two half spheres topped with varying sizes of bronze balls. A lot of fun to make and no major hitches. Since I’ve made these before, I now know to drill a little cup for each ball to sit in before I solder them on. This way, I don’t end up with runaway bronze balls.
However, I had a big problem with the photography. I usually like to photograph my jewelry against a white background, but no matter what setting or angle I tried, I could not get a decent picture. I finally switched to a dark gray background, and a black duvetyne. That seemed to work much better.
 I think it was really difficult to capture the contrast between the silver and bronze colors. No matter, the ring looks gorgeous on the hand.
 What did I learn this week?
See you next week…(and it’s a doozy!)
Been too cool lately? Want to get back in touch with your inner geek? Need to suck up to your math teacher or your kid’s math teacher? Well, have I got the ring for you! March 14 is Pi Day, and what better way to celebrate than with a Pi ring. If Kate Bush can write a song about it, then why not a ring about it?

But more than just celebrating the number, I think it’s fitting because, as jewelers, we use Pi every time we measure a ring shank to cut to an exact size or when we are making any rounded shapes.

This little cutie is made of Sterling silver, finished with very fine steel wool, and measures 12 x 12mm. The shank is oxidized Sterling silver.
I really like hollow geometric shapes and I’m trying to learn how to render them in metal. I’ve been wanting to make cone shapes for a while, so here I am this week, practicing how to make a cone. A pointy one. Not a cone with the top cut off – I think that’s called a frustum (what an ugly word!)
Anyway, a real pointy cone. I had no problem with the geometry, and calculating the area to be cut out of the sheet was a snap. I started making it out of 20ga sheet (0.8mm), but soon discovered there was no way on earth I was going to be able to bend that thing into shape, so I switched to 22ga (0.64mm). Well that wasn’t so easy either. I was reluctant to use any thinner sheet because I wanted the shape to hold up when worn as a ring. So I kept going with it. I broke 2 pliers but kept at it until I got some kind of conish shape. I didn’t know what I was doing. Zero. I think I just got lucky and ended up with the shape.

I made the sphere and cylinder to go with my cone (actually so I can hide all the imperfections) and decided to call the ring “Still Life” because it reminded me of a charcoal drawing. The imperfections are barely visible!
 I think it turned out pretty good! At first, I had a scratchy finish on it with no oxidation, but I could not take a decent picture of the ring, so I oxidized it and finished with a brass brush and I like it better this way.
 It looks fantastic on the finger. I think I’m keeping this one for me.
See you next week…
